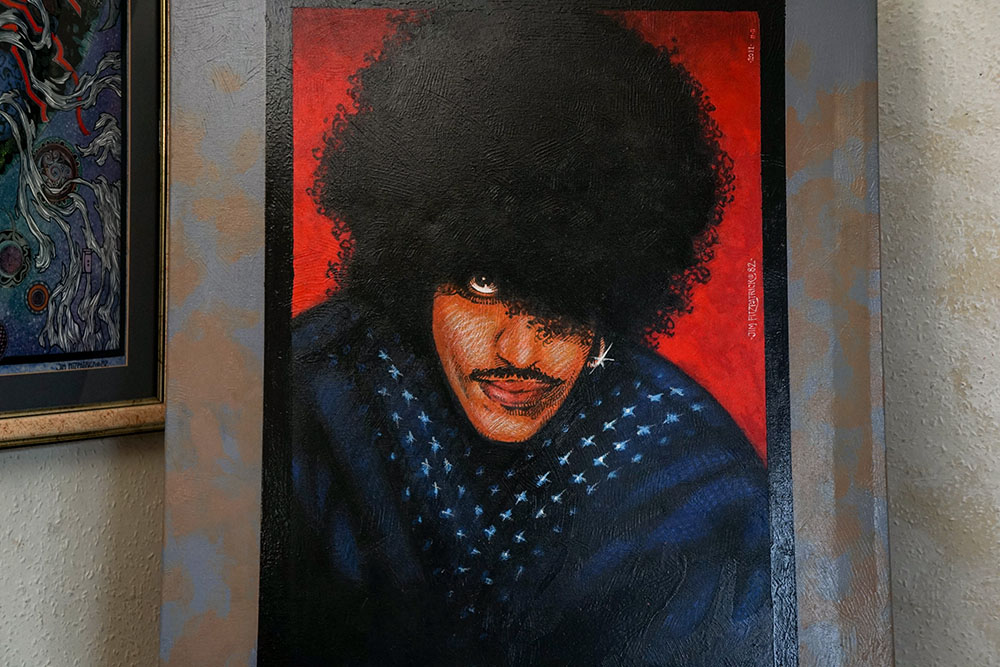
Philip Lynott Maxell Painted Canvas Making of an Artwork
PHILIP MAXELL PAINTING
This pen and ink preliminary drawing of my mate Philip Lynott has always been a favourite of mine so when I saw the new black and white canvas print of it I was so impressed myself with the standard of printing that I decided to see if I could do a painted version directly over the print, using it as a template.
I just couldn’t NOT paint this one.
I think this new finished version is actually slightly superior to the 1982 colour painting original but I’m also curious to see what Lizzy fans think too.
I recorded the complete painting process too so here we go….
Check out the finished product here!
VIDEO ONE:
The canvas print arrives and off comes the protective wrapping and I gently brush it with a moist J-Cloth then apply a heavy layer of clear artists varnish.
VIDEO TWO:
The red used for the under-painting is a weaker hue of cadmium red which is more transparent than the final red layer of Windsor and Newton Cadmium red medium. I over paint this weaker red hue over the blacks then wipe it down to reveal the printed black and leave it show under a lighter layer for later.
VIDEO THREE:
Next up is the blue on Philip’s sweater. I use the lighter hue of Blue Ultramarine to paint over and add a few extra transparent layers of this hue until it saturates the black underneath but still allows it to show through. This process is sped up by using a hairdryer to seal each successive layer. Finally I add a fairly thick darker blue layer to give a slightly more tonal graded effect.
VIDEO FOUR:
Next up for me to tackle the face. Always a challenge even though I know Philip’s face better than my own. As I have studied, drawn and painted it endlessly since my first efforts back in 1972 for the thin Lizzy album ‘Vagabonds of the Western World’.
Now here is the weird bit. While I am writing this description I am watching the movie recording of my method and approach and I watch it through as if I have no memory of my own effort.
I recollected the actual face paintwork with the multiple layers of washed paint, all dried as I added them and I recollect the fine-tuning with a paper towel edge to push through the facial tones and add light to them all but completely forgot that I had added a ton of very fast pencil work over the first few layers of thinned out paint to give a slightly hand drawn effect.
For all I knew this face could have been pencil-painted by an alien. I was kind of surprised as I have a superb memory and can remember how I have produced every bit of artwork I have ever done. For what it’s worth this recording is like gold dust to me now and the technique is both new and very interesting.
Maybe I was watching bloody ‘Ancient Aliens’ again as I worked but that pencil work is as new to me as it is to you guys watching this.
Strangely I got it right first time and when it was finished I abandoned the idea of adding white pencil, highlights as on the original and just left it as it was: better and more compelling artistically, in my opinion, than the face on the actual original.
VIDEO FIVE:
Back to the blues. This the easy bit for me, just fun as the detail of the studded sweater are highlighted with lighter cobalt blue then a mix of blue and white acrylic is added and brushed at an angle to give a slight shimmer effect as on the original artwork.
Cleanup next and a dryer to seal the paint finished this part off.
VIDEO SIX:
Black paint straight from the tube, alla prima, onto the canvas for speed and execution as the black has to be a strong layer for visual effect -and also to add some paint texture to the hair.
Next up I resume adding the detailed edges to the hair using the semi transparent weak red as my guide. I don’t follow this rigidly, rather I like a spontaneous effect and I apply this either side, all painted flat rather than on the easel so detail is easier to apply this way for me anyway.
VIDEO SEVEN:
There is a bit missing on this final recording where I added a rich layer of full, undiluted Cadmium Red Medium for the background which is so important as this red sets off the other limited range of colours used but if you look closely you can see the depth of the paint outlined by the light.
Retouching the blacks, blues and other loose ends is completed and I move to the final stage where the white edges are painted with Titanium White and any loose paint or drips are buried under the three layers of white paint. The painting is then allowed to dry naturally and two layers of light varnish are applied over the course of the next day for protection.
All done and ready to go and recorded for the website so everyone can see what I get up to when I producing this artwork. Have fun. I did 🙂
